 基于SpringBoot和Redis实现短信验证码功能
作者:鱼仔
博客首页: codeease.top (opens new window)
公众号:神秘的鱼仔
# (一)概述
在日常使用各种app或者登陆网站的时候,基本都会看到短信验证码这个功能,实现短信验证码的方式有很多,这里给出基于SpringBoot和Redis的短信验证码实现方式。源码在文末
# (二)思路
把一切都简化,短信验证码的实现无法就是下面几点:
1、后端随机生成短信验证码,并在服务器端保存一定时间(一般是5分钟)。
2、将短信验证码发给用户。
3、用户输入短信验证码提交后,在后端与之前生成的短信验证码作比较,如果相同说明验证成功,否则验证失败。
其中在服务器端保存一定时间的这个操作我一下子就想到了redis,那就用redis来实现吧!
如果你还不熟悉如何在SpringBoot中使用redis,可以快速翻阅一下我之前的一篇文章: redis入门到精通系列(十):springboot集成redis及redis工具类的编写 (opens new window)
# (三)搭建项目
首先搭建一个SpringBoot项目,这一步就不讲了,如果你还有问题可以直接看我的SpringBoot系列。
# 3.1 引入依赖
<dependencies>
    <dependency>
        <groupId>org.springframework.boot</groupId>
        <artifactId>spring-boot-starter-data-redis</artifactId>
    </dependency>
    <dependency>
        <groupId>org.springframework.boot</groupId>
        <artifactId>spring-boot-starter-thymeleaf</artifactId>
    </dependency>
    <dependency>
        <groupId>org.springframework.boot</groupId>
        <artifactId>spring-boot-starter-web</artifactId>
    </dependency>
</dependencies>
2
3
4
5
6
7
8
9
10
11
12
13
14
这里只需要引入上面三个依赖即可。
# 3.2 配置Controller
新建一个包叫Controller,新建类IndexController,编写一个简单的首页跳转:
@Controller
public class IndexController {
    @RequestMapping(value = {"/","/index"},method = RequestMethod.GET)
    public String index(){
        return "index";
    }
}
2
3
4
5
6
7
此时,如果访问ip:端口/或者ip:端口/index,就会跳转到index.html这个页面上去。
# 3.3 编写index.html
这个页面只需要包含两个按钮和一个输入框即可,页面放在resources/templates下
<!DOCTYPE html>
<html lang="en" xmlns:th="http://www.thymeleaf.org/">
<head>
    <meta charset="UTF-8">
    <title>Title</title>
    <script src="https://cdn.bootcss.com/jquery/3.4.1/jquery.js"></script>
</head>
<body>
<button type="button">发送验证码</button>
<input type="text" id="input_code"/>
<button type="button">验证</button>
</body>
</html>
2
3
4
5
6
7
8
9
10
11
12
13
到这里一个简单的项目前期搭建就完成了,访问一下:

# (四)核心功能实现
# 4.1 配置redis
redis在正式使用前需要编写一个配置类,我在redis系列的博客中都有写,这里就直接用了,新建一个包叫做config,新建类RedisConfig,这个类主要是让redis在传输过程中不会乱码。
@Configuration
public class RedisConfig {
    //自定义的redistemplate
    @Bean(name = "redisTemplate")
    public RedisTemplate<String,Object> redisTemplate(RedisConnectionFactory factory){
        //创建一个RedisTemplate对象,为了方便返回key为string,value为Object
        RedisTemplate<String,Object> template = new RedisTemplate<>();
        template.setConnectionFactory(factory);
        //设置json序列化配置
        Jackson2JsonRedisSerializer jackson2JsonRedisSerializer=new
                Jackson2JsonRedisSerializer(Object.class);
        ObjectMapper objectMapper=new ObjectMapper();
        objectMapper.setVisibility(PropertyAccessor.ALL, JsonAutoDetect.Visibility.ANY);
        objectMapper.activateDefaultTyping(LaissezFaireSubTypeValidator.instance);
        //string的序列化
        StringRedisSerializer stringRedisSerializer=new StringRedisSerializer();
        //key采用string的序列化方式
        template.setKeySerializer(stringRedisSerializer);
        //value采用jackson的序列化方式
        template.setValueSerializer(jackson2JsonRedisSerializer);
        //hashkey采用string的序列化方式
        template.setHashKeySerializer(stringRedisSerializer);
        //hashvalue采用jackson的序列化方式
        template.setHashValueSerializer(jackson2JsonRedisSerializer);
        template.afterPropertiesSet();
        return template;
    }
}
2
3
4
5
6
7
8
9
10
11
12
13
14
15
16
17
18
19
20
21
22
23
24
25
26
27
28
# 4.2 发送验证码功能的实现
发送验证码的思路就是生成验证码,存储验证码,通过短信接口发送验证码。这里的短信接口市面上有很多,使用起来无非就是一个get或者post请求,我这里就用控制台输出代替了。
在IndexController增加一个接口,用于发送短信验证码:
@Controller
public class IndexController {

    @Autowired
    private RedisTemplate<String,Object> redisTemplate;

    @RequestMapping(value = {"/","/index"},method = RequestMethod.GET)
    public String index(){
        return "index";
    }

    @ResponseBody
    @RequestMapping(value = "/sendmessage",method = RequestMethod.GET)
    public String sendmessage(){
        //这里的userId在真实业务中通过个人身份的令牌获取,这里直接仿造一个
        String userId="1";
        //生成六位数随机验证码
        String code=getCode();
        //设置redis的key,这里设置为项目名:使用的字段:用户Id
        String redisKey="VERIFATIONCODE:CODE:"+userId;
        //将这个验证码存入redis中,并设置失效时间为5分钟
        redisTemplate.opsForValue().set(redisKey,code,300, TimeUnit.SECONDS);
        //发送短信
        boolean isSuccess=send(code);
        if (isSuccess){
            return "success";
        }else {
            return "fail";
        }
    }

    private boolean send(String code) {
        String msg="验证码为:"+code+",验证码有效期5分钟,请及时验证";
        System.out.println(msg);
        return true;
    }

    //生成六位随机验证码
    private static String getCode() {
        Random random = new Random();
        String result="";
        for (int i=0;i<6;i++)
        {
            result+=random.nextInt(10);
        }
        return result;
    }
}
2
3
4
5
6
7
8
9
10
11
12
13
14
15
16
17
18
19
20
21
22
23
24
25
26
27
28
29
30
31
32
33
34
35
36
37
38
39
40
41
42
43
44
45
46
47
48
代码注释都写了,需要注意的是redis的key值命名方式,将项目名:使用的字段:用户Id设置为key,当然也可以采用其他办法。
接着在前端的页面上给发送验证码的按钮增加一个点击事件,并通过ajax来调用接口。
<!DOCTYPE html>
<html lang="en" xmlns:th="http://www.thymeleaf.org/">
<head>
    <meta charset="UTF-8">
    <title>Title</title>
    <script src="https://cdn.bootcss.com/jquery/3.4.1/jquery.js"></script>
</head>
<body>
<button type="button" th:onclick="sendmessage()">发送验证码</button>
<input type="text" id="input_code"/>
<button type="button">验证</button>
<script>
    sendmessage=()=>{
        var resultjson;
        $.ajax(
            {
                url: "http://localhost:8080/sendmessage",
                type: "GET",
                async:false,
                dataType:'text',
                success: function (result) {
                    resultjson=result;
                },
                error: function ( status) {
                    console.log("error")
                }
        });
        if (resultjson=='success'){
            alert("短信发送成功");
        }else{
            alert("短信发送失败,请联系管理员处理")
        }
    }
</script>
</body>
</html>
2
3
4
5
6
7
8
9
10
11
12
13
14
15
16
17
18
19
20
21
22
23
24
25
26
27
28
29
30
31
32
33
34
35
36
# 4.4 验证短信验证码
在IndexController中再增加一个接口用来验证,逻辑就是把redis中存在的值和输入值进行比较
@ResponseBody
@RequestMapping(value = "/checkCode",method = RequestMethod.GET)
public String checkCode(@RequestParam("inputCode") String inputCode){
    String userId="1";
    //设置redis的key,这里设置为项目名:使用的字段:用户Id
    String redisKey="VERIFATIONCODE:CODE:"+userId;
    String realCode= (String) redisTemplate.opsForValue().get(redisKey);
    if (realCode!=null&&realCode.equals(inputCode)){
        return "success";
    }else {
        return "fail";
    }
}
2
3
4
5
6
7
8
9
10
11
12
13
14
还是一样给验证按钮也加一个点击事件,checkCode方法加到sendmessage方法后。
<button type="button" th:onclick="checkCode()">验证</button>

checkCode=()=>{
    var resultjson;
    var input_code=$("#input_code").val();
    $.ajax({
            url: "http://localhost:8080/checkCode",
            type: "GET",
            async:false,
            dataType:'text',
            data:{inputCode:input_code},
            success: function (result) {
                resultjson=result;
            },
            error: function ( status) {
                console.log("error")
            }
    });
    if (resultjson=='success'){
        alert("验证成功");
    }else{
        alert("验证失败,验证码错误")
    }
}
2
3
4
5
6
7
8
9
10
11
12
13
14
15
16
17
18
19
20
21
22
23
24
# (五)效果展现
首先点击发送验证码,页面上弹出短信发送成功,后台接收到验证码:

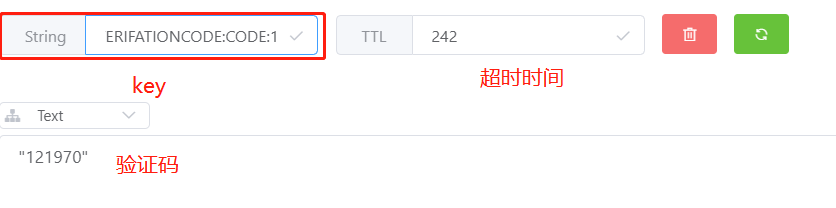
观察redis中的数据
首先输入一个错误的数据

再输入一个正确的数据

最后给出源码:项目源码 (opens new window)